Nintendo Switch Control Layout:
Control in the hangar using a round cursor controlled by sticks. The left stick is used to move the cursor, the right stick is used to scroll through the elements located under the cursor (for example, the side panel, it can also spin the tank in the hangar by moving the cursor over it).
Main selection and confirmation button — A. To change, for example, the number of shells of a certain type in an ammo, you need to move the cursor over the slider of the number of shells with the left stick, press the A button and move the slider with the movement of the left stick.
In portable mode, any action in the hangar interface can also be performed with touch input, just like on mobile devices (Nintendo Switch has touch screen).
In addition to the virtual joystick, the following quick actions are available in the hangar, tied to buttons/keys (a hint about some of them is displayed on the black info panel at the bottom of the screen):
ZL, ZR — switching between tanks in the carousel.
↑ — tank filter.
↓ — tech tree.
Y — tank equipment; switching between tabs is done with L and R.
X — start battle.
+ (Plus) — ingame shop.
Optionally:
B — cancel and/or return to the previous screen.
Y — purchase confirmation.
Unlike the hangar one, the combat control from the gamepad is mostly not duplicated by the touch control. By tapping on the screen you can turn on the equipment and switch the types of shells, as well as choose boosters and use a special interface in some combat modes, but the main actions are made purely on Joy-Con / gamepad.
The controls that are displayed in combat have small hints with button marks on the gamepad that activate these functions.
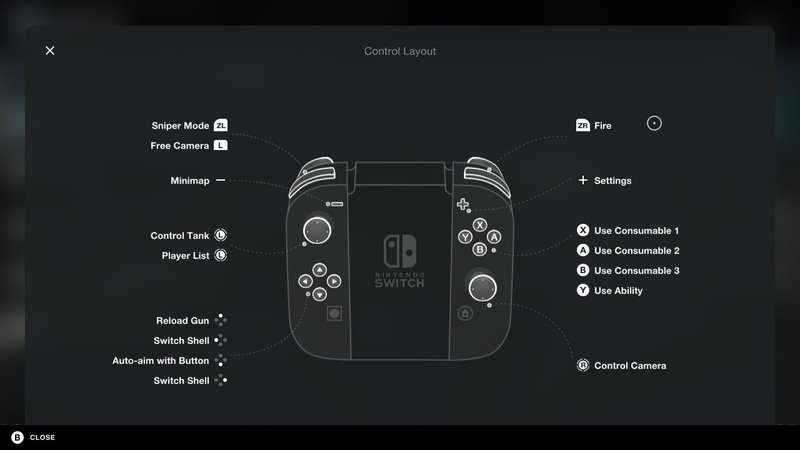
Main control scheme:
ZL — switching to sniper mode and leaving it.
ZR — firing.
L — free view mode (press L and rotate the camera with the right stick).
Left stick – tank movement. Clicking the left stick opens a list of commands and hides the mini-map.
↑ — magazine reloading; is not used on non-magazine guns.
←→ — shell type selection.
↓ — on/off automatic aiming (only if "Auto aiming by button" option is enabled in game settings).
+ (Plus) — combat menu / settings.
X, A, B — activation of equipment from the first, second and third slot.
Y — Additional ability (in some combat modes).
Right stick – camera control.
Before the start of the battle when choosing boosters:
L, R — booster selection (moving left and right)
A — booster activation/deactivation.
The mechanics of the autoaim on Switch is similar to that on mobile devices (soft following aim)
By default, the autoaim is always on. In the settings, you can enable its activation and deactivation by the ↓ button (separately for arcade and sniper scopes), or leave it permanently enabled only for sniper or arcade mode only.
This feature allows you to point the sight in sniper mode by tilting and moving the Nintendo Switch itself (including Lite), detached Joy-Con or Nintendo Pro Controller. For this purpose, a built-in console/controller gyroscope is used, which determines the position in space. It can be convenient when you need to correct the reticle position quickly and accurately. The gyroscope is not used in arcade mode.
The feature is disabled by default and is activated in the control settings if necessary. It requires some adjustment and is recommended for experienced players.
Those who like to play in Tablet-mode with split Joy-Con should keep in mind that to aim the gyroscope uses only the right Joy-Con.